Wednesday, December 28, 2016

Top Ten of 2016 | Blog Hop

Hi everyone.  I hope you are all ready for the New Year but before we go there, I'm participating in a Top Ten Blog Hop with an amazing group of ladies.  You are sure to be inspired with all sorts of amazing ideas AND I hear there's several opportunities to WIN PRIZES along the way.

I'm giving away two $10 gift certificates to Paper Issues.  Read more about it at the end of my post.

Without further ado, here's a few of my fave layouts from the year.  I chose to limit it to all layouts but you can see more of my favorite projects here and on Instagram.


Wild & Free


Grateful Heart + Free Cut File

Embrace Life

I hope you are enjoying this hop and that you are soaking up all sorts of inspiration!  

GIVEAWAYS
I'm giving away two $10 gift certificates to Paper Issues.  Here's how to enter:
  • Giveaway #1: Follow me on Instagram @heatherleopard and leave a comment on the Top Ten Post. Tag a friend in the comments for bonus entries - 1 per friend you tag. You have until December 31, 2016 at midnight CST to enter.
  • Giveaway #2: Follow me here on my blog and leave a comment on this post. You have until December 31, 2016 at midnight CST to enter.
Now, it's time to visit a sweet, talented friend of mine, Rebecca Keppel.

Wednesday, December 14, 2016

DIY Mini Christmas Pinatas

Ho, ho, ho and Merry Christmas..  I'm so excited to show you these mini Christmas pinatas I whipped up.

 I created these for us to just have around the house as part of my Christmas decor but as I was making them, I couldn't resist the urge to fill them with candy.  I'm giving it only a few days before I break down and give them to the girls as a nice little treat.

Supplies:

  • cardstock (I suggest matching to the main color of the patterned paper you choose) 
  • patterned paper - NOTE: Please see the supply list at the bottom of this post for actual patterned papers used. I substituted 2 of the papers shown above. 
  • paper trimmer (to cut the paper strips) 
  • fringe scissors or regular scissors to make the fringe 
  • shaped box cut files (I searched high and low for 3D pinata files with little success so my simple solution was to use Christmas shaped box files) 
  • adhesive 
  • sticky dots 
 Let's whip up a few DIY mini Christmas pinatas. First, the Christmas tree.....

  1.  First, fold the cut out shape into the box form. Put them together to form the box.  You may chose to fill them with treat prior to putting them together.


2. Cut 1" strips of Christmas tree patterned paper.  Then cut small fringe from the bottom up leaving approximately 1/4" uncut at the top.


3. Wrap the fringe around the tree.  You may have to cut at the sides to keep your lines straight but you can't tell once you put it all together. Add sequin or enamel dots as decorations.

Next is the ornament...  

I used a circular box cut file and then modified it to create the topper for the ornament.

Create your box by adhering the ends of the paper strip together.  Adhere one side of the ornament to the circle. Next, fill the ornament with any treats or leave it empty if it's for home decor like me. Then adhere the other side of the ornament.

 
  Cut your paper strips into fringe as per step 2 above.


I added the fringe around the sides first and then I decided to add a circle underneath the fringe so that the red ornament would not show through the fringe.


I added fringe layers on top and then embellished with sequins. I added a coordinating pattern as the ornament topper.

 And last but not least, the candy cane...

I found a cute candy cane shaped box in the Silhouette store and made a couple of cuts.
Then it was just a matter of rolling the bottom portion into a tube and adhering it.  The top part was a bit tricky because you had to roll it while also adhering it at the right angle but it worked out good in the end, once it was covered in fringe.


Fill it with treats or leave empty like I did since it's part of my home decor.

So there you have it, folks. The most adorable DIY mini Christmas pinatas I've ever made and yes, these are the first mini Christmas pinatas I've ever made.

Supplies:
HOLLY JOLLY OH DEAR PATTERN PAPER 
HOLLY JOLLY HAPPY HOLIDAYS PATTERN PAPER 
HOLLY JOLLY GINGERBREAD PATTERN PAPER
HOLLY JOLLY EPHEMERA 
American Crafts Textured Cardstock 12"x12" - Leaf 
American Crafts Textured Cardstock 12"x12" - Crimson

Tuesday, December 13, 2016

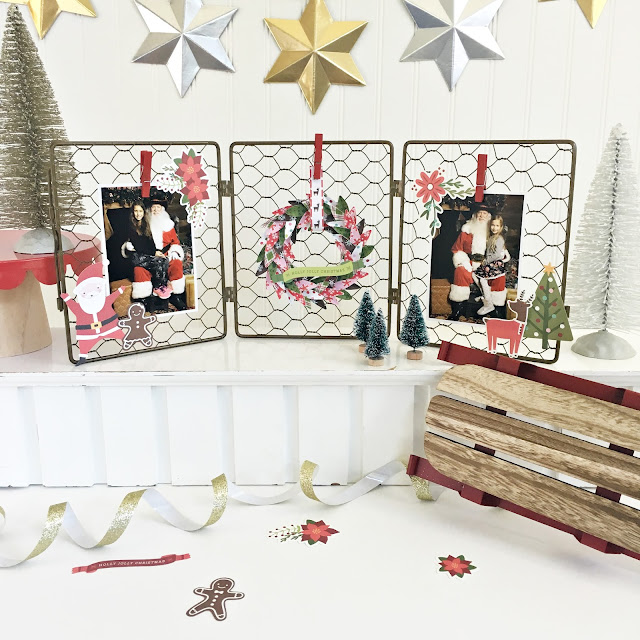
Holly Jolly DIY Home Decor

Happy Holidays, everyone!  I hope you're enjoying this holiday season. I just love the holiday spirit - the excitement, the baking, the decorating, especially DIY decorating!
DIY Christmas Decor made by @HeatherLeopard using the #HollyJolly collection from @PebblesInc
I thought I'd offer a tutorial to walk you through the process of creating this cute Santa display. 


Gather the following supplies:
  • Trifold frame - I got mine at one of the big box stores in the fall decor
  • 6 different pattern papers from the Holly Jolly collection.  See my supply list at the bottom of this post.
  • Circle for the base of your wreath
  • Die cuts (not pictured)
  • red clothespins (not pictured)
  • Foam Dots
  • 2 of your favorite photos.  You can use this to display cards as well.

Cut oval shapes in two different sizes  out of the pattern paper. I cut approximately 10 large and 8 small out of each paper.


Fold each shape in half to give it leaf-like dimension.


Adhere the larger leaves to the circle, alternating them and pointing them away from the sides. It's okay if you can see the base of the wreath.  You'll soon be covering this up with the smaller leaves.


Once you've created your base layer of leaves, start adding the smaller leaves to the top, alternating them and paying close attention to ensure you don't layer the same pattern on top of each other.


  Your finished project should look similar to this.  You may have to re-bend some of the leaves as they may have flattened out during the process of adhering them.


  Add a sentiment to the top, using foam dots. Then loop paper around the top of the wreath so that it appears like it is ribbon. Hang from a red clothespin to the middle part of the frame.

  Hang your photo on the left side and add die cut embellishments.

  Repeat on the right side.


Display this fun DIY frame in your home's entryway as a welcome to guests or on your mantle.  From my family to yours, we wish you a very Merry Christmas!

Supplies: HOLLY JOLLY OH DEAR PATTERN PAPER
HOLLY JOLLY MITTENS PATTERN PAPER
HOLLY JOLLY GINGERBREAD PATTERN PAPER
HOLLY JOLLY CHRISTMAS PLAID PATTERN PAPER
HOLLY JOLLY HAPPY HOLIDAYS PATTERN PAPER
HOLLY JOLLY PEPPERMINTS PATTERN PAPER
HOLLY JOLLY EPHEMERA
STICKY THUMB DIMENSIONAL ADHESIVE FOAM