Monday, May 28, 2012

DIY Jewelry Made by Yours Truly

Thanks for visiting today and Happy Memorial Day to those from the U.S.A. Many thanks to all who have fought and sacrificed for our country!

I bought all the goodies to make jewelry several years ago but once I sat down to create something, I was overwhelmed with it all.  That all changed when Imaginisce announced they were creating jewelry accessory bits at CHA Winter 2012. It's called the Magni-top collection. Have you seen the necklaces, bracelets and earrings yet? I knew I would have to create something with the collections since I am on the DT and I'll admit that I was hesitant at first.

Here's my first attempt at a necklace and matching bracelet...
Supplies: Imaginisce (i-top 2.0, Magni-top necklace & pendants, Magni-top variety pack, Magni-top bracelet, small button daddies, large magnet daddies); Misc: black ribbon, fabric; The Jewelry Shoppe Findings Round Jump Ring 6MM, Charm Me Crystal Bead Charms, Charm Me Trio Dangle Charm

The new Magni-top jewelry is a great way to add variety to your jewelry collection. I love that you can create a new look using the same piece of jewelry simply by switching out the brads.

For my project today, I threaded black ribbon through the bracelet chain to give it a bit more chunkiness and then I added in a few charms that I got from my local craft store. 
I pulled out my magnet and button daddies and covered them with fabric using my i-top 2.0. I will say that I had a little trouble keeping the magnet daddies from sticking to each other and/or the bracelet but I can't wait to make brads in different colors and designs to match whatever I am wearing.  I can even make brads in my kids school colors and sport for all my kids activities!

Make sure to head over to the Imaginisce blog today to see what some of the other DT gals did and enter for a chance to win your own Magni-top goodies!


Thursday, May 17, 2012

Girly Frame and Creative Video

Hey everyone!  I am soo excited to share a new altered project AND a creative video with you today.

My daughters might be 5 years apart in age but they are really the best of friends!!!  They adore each other so very much. I was in their rooms the other day and realized that they don't have any photos of themselves together so I made it my mission to change that.

The new Little Yellow Bicycle Hello Spring collection just happens to match my oldest daughter's princess room perfectly! Here's what I created and make sure to tune in to the video posted at the end of this blog post to watch as I create this frame.
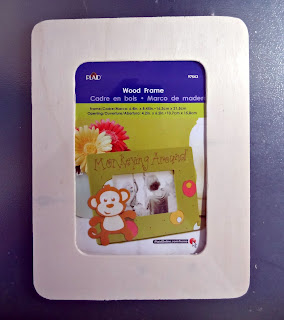
I started out with a $1 frame from my local craft store. It seemed so flat and boring so I decided to give it a fun, multi-dimensional makeover.

To begin, I pulled out all of the double sided 6x6 and 12x12 papers from the Hello Spring collection. I needed a good variety for what I had in mind. I then cut them in strips of varying widths. I kept some with straight edges and I used border punches on others. Once I had multiple strips from multiple papers cut and punched, I cut them into 2 1/2” strips, folded them in half (being careful not to crease them) and glued the edges together.  I repeated this step until I had enough loops to cover my frame, which happened to be 84.  You may need more or less depending on the size of your frame. Be sure to also cut strips to cover the edge of the frame if you get a plain frame like I did. Or I guess you could paint it or leave it bare nekkid. Oh and what do you think of my nails? Have you seen the Sally Hanson nail polish strips at Target?


Once I had all the loops, I started gluing them down on the frame with regular liquid adhesive. I started at the bottom of the frame, placing them next to each other in a row. As I moved my way up the frame, I overlapped the 2nd layer slighter over the 1st and so on until I reached the top of the frame. I had to make sure that no two loops were the same right next to each other but overall this step was fairly quick.


Next, I added the “You Make Me Smile” dimensional sticker to the top left corner and I added the Felt Sticker Flowers and Stick Pins to the bottom right to draw all the elements together.


I saw some people post on the Little Yellow Bicycle blog on National Scrapbooking Day that they'd like to see the designers' creative process so I thought it would be fun to create a video of myself as I was making this project.  I set everything up and recorded my every move from start to finish.  I've edited it down to a quick 4 minute video. 
Did you watch it?  Let me know what you think and if you'd like to see more of these for layouts, cards, altered, or whatever or if I should put an end to my film making career.

Thanks for stopping by today! Make sure to head over to the Little Yellow Bicycle blog and leave me some love!

Wednesday, May 16, 2012

Hello, Cupcake! Gifts, Party Hats & Template/Tutorial

I can't decide which I LOVE more, the name of the new Imaginisce collection or the actual collection itself. Hello Cupcake!  I love the rich colors of the collection and all the little elements. I've been playing around with it all week so I thought I'd share two of the many projects I've made so far. The others are still in my head, wishing one of us was having a birthday soon.

Oh Happy Day Gift Bag

Whether you're giving a gift for a teacher or celebrating a birthday or any other special event, it's easy to dress up a simple bag. I used a Kraft lunch bag and dolled it up with paper from the Hello Cupcake 6x6 paper pad, doilies, punches, ribbon and lace. This can be used for any occasion and is sure to make someone's day happier!


Party Hat, Tutorial & Template

Everybody needs a party hat to celebrate their big day. Try this one on for size! Made with the new Imaginisce Hello Cupcake collection, a bit of trim and a template with step x step instructions available for download further down within this post. The honoree is sure to feel special!


My youngest daughter has been wearing this hat all around the house.  I think I will have to use the template I created to make other versions of the hat...maybe some princess themed ones with tulle and bling! Or, I was just looking at the hat and I guess you could also use the template to make a teepee. Does it look like a teepee to you?  All you'd have to do is change up the color combo and you'd be all set to play cowboys and Indians.

I created a free TEMPLATE download so you can make your own. I've also included step x step instructions and photo tutorial for you below. You can see more of my templates and tutorials by clicking the "Tutorials & Downloadables" tab at the top of my blog.

Here's how I made it.
  1. I cut out my template and traced it onto the back of a 12x12 paper. I then cut it out of the 12x12 paper and glued the tab on one side to the edge of the other side.
  2. Cut a strip of paper, measuring 1" x 20" and a 2nd piece 1" x 2". 
  3. Fold each strip in half lengthwise and cut slits to the center. Not all the way through, just about 1/8" from the center.
  4. Open the paper strips and adhere the longest piece to the bottom of the hat and the short piece to the top of the hat. Tip: align the seam of the paper strip to the seam in the back of the hat. 
  5. Add additional trim to the hat as desired.
  6. Decorate the middle of the hat, if you are so inclined. To make mine, I cut scallop circles from my Spellbinders dies, added some red jute around each scallop as seen below and added the sticker over the top.
  7. I then blinged the scallop circle and the gifts.
  8. Last but not least, add some ribbon to the hat to help keep it from falling off when you blow out the candles!

Click to Enlarge; Right Click to Print or Save Image
Thanks for stopping by today. Make sure to head over to the Imaginisce blog to enter for a chance to win a collection of Hello Cupcake!

Monday, May 14, 2012

Let's Go Fly a Kite

I have a little secret to tell ya.  It's about this layout I created using my Scrapbook Circle Remember This kit, which was packed with My Mind's Eye Follow Your Heart.


My Mind’s Eye Follow Your Heart Honey Blue, My Mind’s Eye Follow Your Heart Be Amazing 6x6 Paper Pad, My Mind’s Eye Follow Your Heart Be Amazing Fly & Soar 12 x 12 paper, My Mind’s Eye Follow Your Heart Be Amazing 12x12 Chipboard, My Mind’s Eye Follow Your Heart Be Amazing Twine, Janome Sewing Machine, American Crafts Precision writer pen, Tattered Angels Peacock Blue Mist

So on to the secret...My secret is not that I created this layout using the leftover scraps of paper and chipboard. It's not that I had to bribe my daughter with some pretty costly perks and a fave dessert to get her, my sensory child, to lay on the hard concrete and pose. She actually did so on her own will but got antsy once I started needing to reposition myself, snap a pic, fix her dress, snap a pic, move her up a smidge, move her left a smidge, snap a pic, move her hands back down, and tell her to act like she's having FUN for Pete's sake!  Nope that is not the secret but I should totally post the "meltdown" pics.  She's actually smiling in these...
The secret involves all of the above but I did something I never do. I created a layout without having the pictures for it.  I knew I wanted to do some chalk art photos after seeing a couple on Pinterest where people drew king/queen crowns and then posed their children with them.  Apparently I didn't pin them to my board and just pinned the idea of chalk art photos to my brain or I'd link you to some of them. I actually created the layout weeks before I had the time to get out there and get artsy with the kids.  

Do YOU ever create a layout before you've taken the photos? It's just impossible to me to be able to predict what photos I'll end up with.  I admire people who can do a layout for their upcoming child's birthday party a month before the party and have it turn out perfectly...I'm talking about you, Major Ken!!! How do they do it? These were pretty easy because I took them far enough away that I could make them portrait or landscape, plus I knew what I needed so I didn't sweat it. 

You can't even tell that this is made from scraps but trust me, those photos just barely cover the cuts and edges. I love my little smorgeshborg layout! Here's the last remaining bit of chipboard I had left.

Oh, I should mention that I added title within my art "masterpiece" and journaled on the back!

I have more photos on my youngest daughter for a fairy tale layout that I have yet to start.  I will of course, post it here when I have it.

Thanks for stopping by today!

Wednesday, May 9, 2012

Summer Tote Gift Idea & Tutorial PLUS WOYWW

Here for Workspace Wednesday? It's at the end of this post so stay tuned...

I guess it's design team swap week.  Yesterday, I featured some DIY gift card boxes that I made with Little Yellow Bicycle and Petloo.  Today I'm featuring Canvas Corp and Imaginisce. Canvas Corp sent me a ton of canvas, burlap, fabric flowers, mini (white and kraft) envelopes, a shadow box, Tattered Angels mists and a ton of jute and colored cording. They seriously spoiled me.

I'm showing you something I created this past week for my daughter to give to her teacher for teacher appreciation week.  Even after making this, I barely made a dent in my stash. I am sure you will be seeing many more projects using Canvas Corp in the near future.

The project I made today uses their canvas bag, Tattered Angels mist, black cording and their large yellow fabric flower. Take a look at the project and then I'll walk you through how I made it.
Here's how I made it...
  • Step 1: Insert wax paper inside the bag to keep the paint from penetrating the back of the bag.  
  • Step 2: Grab a mask template and paint the inside of the mask with a color that matches your bag base color. I wanted the image to run over the right side and bottom of my bag, as you can see from the photo below. I also wanted a tone-on-tone effect since my flower was so colorful. Wash paint off the mask and let dry. I used the Jenni Bowlin Malted Milk Paint Dabber and Pink Paislee Vintage Doily Mask by Christy Tomlinson that came in my Scrapbook Circle May kit.
  • Step 3: Place the stencil in a misting box or over a scrap piece of paper. Mist over the stencil - do not do this step with the mask on the bag.  We are actually making the mask into a stamp and we want the mist to stick to the template.
  • Step 4: Flip misted stencil over and lay it on the canvas, matching up the stencil to the painted stencil image already on the canvas.  You might have to do this step more than once, to get your desired effect.  The photo below is after 1 application and I think I did it 3 times to fill in the gaps. I also added some paint and mist to the top edge of the bag.  Set aside to dry.
    • Step 5: Once the paint and mist is dried, apply a layer of mod podge over it to seal in the color.  Be careful applying the mod podge as it may smear the color.  I simply dabbed it on with my finger instead of brushing it on. I suggest you try it out in an area that will be fully covered by the flower. 
    • Step 6: Take your fabric flower and cut strips of coordinating fabric and burlap (with large scallops to resemble flower petals) and adhere them to the various layers of the flower. You can actually do this while the paint is drying.
    • Step 7: Using your i-top 2.0 and XL bits and pieces, made an XL burlap brad. Insert in the middle of the flower to anchor it all together.
    • Step 8: Next, I added the black cording onto the bag and adhered my flower over the cording.  

    • Step 9: Pack the bag with supplies and you're ready to go.

    This bag is filled with things Rheagan's teacher can use to relax this summer - book, sunscreen, water, a box of chocolate and a gift card (I think I'll keep my sunglasses though). Oh, one last thing...I'm thinking of stenciling her name or monogram to the upper left corner of the bag. What do you think?

    Thanks for stopping by today! Make sure to head over to the Imaginisce and Canvas Corp blogs to see what some of the other design team gals did. There are prizes to be won!!!

    WOYWW - What's On Your Workspace Wednesday?
    I am taking part in a new weekly feature. Well, it's new for me but I first noticed on Jingle and Diana's blogs a while back.  It's called What's On Your Workdesk Wednesday.  I just finished recording my first silent film for a video tutorial that's debuting next week on the 17th.  The project I worked on yesterday is still a secret so it's in hiding but the camera and the mess where I shoved all the little pieces of leftovers from other projects before I started filming are proudly waving at you.  Wow, what a little mess...and this is my desk in what's considered clean because I always seem to have something scrappy in the works.

    xoxo Heather

    Tuesday, May 8, 2012

    Mother's Day Gift Ideas

    Little Yellow Bicycle and Petaloo are teaming up this week and today I'm going to show you an idea for Mother's Day. Actually you could use these for teacher gifts, birthday gifts, father's day (with a more manly look of course), etc. 


    I also got to play with Petaloo, thanks to a Little Yellow Bicycle Hello Spring swap. I'll be honest and tell you that I'm not much of a flower person unless they are handmade but I really enjoyed working with the Petaloo products.  They sent me a gazillion flowers of different types as well as some velvet-like butterflies. I now have a change of heart about flowers after creating these little gift boxes for Mother's Day.


    I know some people prefer to buy gifts instead of gift cards but in my family, anything goes. I don’t mind giving receiving gift cards and I usually invite the person who gave it to me to join me when I go shopping so we can spend the time together. The actual gift cards these days are usually decorated with a great themed design but the card sleeves they come with are often too generic for my liking.  These are super easy to make and I think they add the perfect extra touch.

    I created these small boxes by cutting them out the old fashion way. No cartridge, just a TEMPLATE (designed by Nina Yang), scissors and liquid glue. Note that I changed up the front flap from the template design because I wanted variety and wanted to give it a little touch of me.
    After I cut them and glued them together, which took me less than 30 minutes, I embellished them with a bit of ribbon and Petaloo flowers & butterflies.  Can you see those butterflies??? They have a velvety finish to them and I adore them! 

    Lastly, I choose coordinating papers to hold the gift cards, making sure that the back side of the papers were light colored so that I can include a personal note. I adhered the gift card to the insert with a glue dot. There's a purple gift card tucked in under those little flowers below.
    Lastly, I added additional flowers to the inside cards and voila! Oh and I couldn’t stop making them.  These gift boxes don’t have to be limited to Mother’s Day. They can be for birthdays, father’s day, Christmas, anything.  Actually, I made the 3rd to give for a friend’s birthday. They also don’t have to be limited to gift cards – the possibilities are endless, so long as it can all fit in the box!


    Supplies:
    Little Yellow Bicycle Hello Spring HS-102 Garden Rows/Lilac Love
    Little Yellow Bicycle Hello Spring HS-103 Spring Story/Poppy Linen
    Little Yellow Bicycle Hello Spring HS-104 Flutterby/Sunshine Dots
    Little Yellow Bicycle Hello Spring HS-109 Pretty in Plaid/Tulip Linen
    Little Yellow Bicycle Hello Spring HS-279 Chipboard Shapes with Glitter Accents
    Petaloo Floral Embellishments – butterflies
    Petaloo Mini Tie-dyed Daisies – Yellow, Item # 1309-004
    Petaloo Mini Tie-dyed Daisies- Plum, Item # 1309-021
    Petaloo Mini Tie-dyed Daisies – Fuschia, Item # 1309-017
    Petaloo Mini Tie-dyed Daisies – Blue, Item # 1309-005
    Petaloo Tie-Dyed Jewel Gypsies – Teal/Fusch/Chart/White
    Petaloo Tie-Dyed Gypsies – Raspberry Sorbet
    Petaloo Mini Florettes - Lt. Blue/Dk. Blue/Green
    Petaloo Mini Florettes – Hula Mnky


    Wednesday, May 2, 2012

    What a Day for a Daydream!

    Are you are singing the little daydreamin' diddy now?  I hope that wherever you are it's starting to look less like Winter and more like Spring.  It's been quite warm here in Texas for some time now, warm enough to get in the pool this past weekend.

    Today I'm sharing a layout I created with the new Little Yellow Bicycle Hello Spring collection.  I absolutely LOVE the variety of embellishments that they offer with each collection.  This layout is about a leisurely afternoon mommy/daughter moment outside. I'm on a 2-page kick lately, though I haven't posted them all here yet.  I am especially enjoying mixing it up a bit with coordinating backgrounds.
    Supplies: HS-101 Blossom Breeze - single-sided with glitter accents, HS-106 Bloom & Grow/Sweet Pea Vine, HS-304 6" x 6" Paper Pad, HS-133 6" x 6" Decorative Edge Double-sided Textured Cardstock - with glitter accents, HS-279 Chipboard Shapes - with glitter accents, HS-220 Fabric Favorites - self adhesive, HS-230 Clear Cut Shapes - with glitter accents, HS-135 Cardstock Stickers - Favorite Pieces - with glitter and embossingHS-1100 Tear-out Ticket & Journaling Book - with glitter accents, Bazzill Tape runner, Black Zig Pen

    It might be a bit hard to see but I stitched on the tree to give it a more realistic look, including a heart shape in the center of the tree trunk. You may have to click to enlarge to see the details.

    I also cut one of the chipboard frames in half and used it to frame up my title by adding the background paper from the 2nd page behind it and topping it off with phrases and alphas.

    This layout has regular journaling on the upper right page but I also used the tear out tickets with the date to add a tad bit of hidden journaling.  

    Make sure to head over to the Little Yellow Bicycle blog today to see Corrie and Liz's 2-page layouts and check in with us on National Scrapbooking Day for lots of fun and prizes!

    Tuesday, May 1, 2012

    Adorable and Oh So Charming & Blog Hop Winner

    It was simply impossible to not include the My Mind's Eye Follow Your Heart "Be Happy" Adorable paper on your scrappy wishlist!  I just had to have it!!!  I mixed it with another MME Follow Your Heart line, "Be Amazing" and it paired up really well.  The golds in the Be Amazing collection were perfect for the carousel colors and the "Be Happy" paper with the Instagram picture windows worked awesomely. I loved it so much I used it for my A Bit of This & That class in April at Scrapp'n Savvy.
    Supplies: My Mind's Eye Follow Your Heart "Be Happy" Adorable 12x12 Paper, "Be Amazing" 6x6 designer paper pad, "Be Amazing" Blue Doily 12x12 paper, "Be Amazing" decorative brads, "Be Amazing" chipboard, American Crafts Wow glitter paper in gold, Imaginisce i-top 2.0 and small brad daddy, Bazzill Tape Runner, Zig Black Pen.

    I wish I could snap more pics of this layout because you can't see all the dimension but it's on display at my LSS.  Instead, I'll have to tell you about it - I cut out some of the Instagram windows and popped the photos back behind them. Other windows have coordinating paper or photos popped up over it. Lastly, some of the windows just have paper adhered to them. So, all in all, there are 3 levels of dimension from back to front.

    Before I go today, I want to thank everyone for helping us celebrate Diana's blogiversary by hopping along with the talented gals I was lucky to be a part of.   Thanks to Random.Org, the lucky winner of the Amy Tangerine prize RAK on my hop is KRISTIN (a fellow Texan). Congrats!!! To claim your prize, shoot me an email no later than Tuesday, May 8, 2012 via the About | Contact Me tab at the top of the page.